I loved the
wainscot that I installed in the dining room in our last home. It made such a difference in the look of that room. I knew I wanted to repeat that same look in the dining room of our new home. In this home, I have already installed a planked wall
wainscot in the kitchen, and in the
bathroom, but chose to go the more traditional route of picture frame wainscot for the dining room.
I started by painting the lower portion of the wall the same white as all the trim in the house is. I did not do this first last time, and it was hard to do several coats with the molding up so I chose to do this first this time. I actually learned from my mistakes!!!
The wall color is a very light off white - it looks tan in this picture. It is the flat paint the builders used, and it is getting changed. It looks similar to this in the after photos at the end of the post, but it is actually painted Sand Beach (SW color mixed in BM paint).
For the chair rail, I used the same door casing (we upgraded to 3 /14 in. in our home) that I used on the plank walls. I simply wrapped this around the corner to the dining room. Just installing that made a big difference!
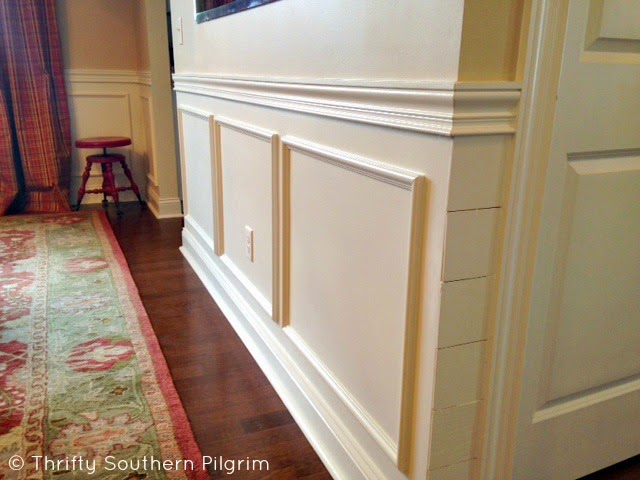
Here is the corner, before caulk and wood filler and paint. This little wall is on the left of the bathroom, and I already planked the wall to the right of the bathroom door. Doing this little section really makes a difference when looking at the bathroom door.
Here is that same area after.
Here is how I ended the section where the door to the butler's pantry is. You make it return to the wall, the same way you do with crown molding. You simply make an OUTSIDE corner cut about an inch in from the end of the wall. Then make a very small piece with another outside corner cut, but there is no length to it. I do not nail this in place, I use wood glue, and painters tape to hold it while the wood glue dries. After sanding and caulking and painting, it will look much better.
Here is that same spot after paint and caulk (keep in mind the corner is not painted yet....)
To figure out how big to make your boxes you:
Measure your wall
Decide how many inches between your boxes (I chose 3 Inches)
Decide how many boxes you want (this will be trial and error)
Then subtract the 3 inch space on either end and between your boxes from the total wall measurement
Divide this by the number of boxes
Your answer is how big your box should be.....
The picture below depicts the wall with 3 boxes on it with 3 inches of spacing all around. Both between and above and below each box.
My method when installing was to draw my boxes on the wall in pencil - this was you know if you need to adjust for an outlet. Like I did, but it is hidden behind the china cabinets!
Then I measured and cut the top and bottom pieces (they should be the same length. I also cut the side pieces (these stay the same for the
entire room) EXCEPT for under the window.
I installed the top horizontal piece first, using a level. Then I installed the right vertical side. Then I put one nail in the bottom horizontal piece (on the right hand side). Then I put one nail in the left hand vertical piece at the top. This allowed me to have a little wiggle room at the bottom right corner, to make certain it was a tight fit before nailing the bottom and left piece fully.
The white makes such a difference in this room, it really brightens it up. And the addition of molding makes it even better! Molding makes everything prettier! I just love how it turned out and can't wait to do another molding project. Here are photos of the finished room.
This picture is not good quality at all but it really shows the entire room. I don't have that capability on my camera, so I used the panoramic setting on my iphone for this.
COST BREAKDOWN:
I bought 8 foot sections of the trim and needed about 16 pieces total. They were $8 each.
Trim total = $128
Chairrail - FREE (it was left over from building)
Paint - FREE - I already had it but it was about $65 for the gallon of semi-gloss BM
Nails - already had
Caulk - already had
GRAND TOTAL: $128
**
Update: I forgot that I also bought the wall color for this room. So add Benjamin Moore paint @ $35
Total gets bumped up to:
$163 ***
Visit my other wainscot projects in this house:
Plank Wall in Kitchen
Plank Wall in Bathroom
Thanks for visiting today, and come see me again!!!
Submit your email address on the right side and you will get emails when I put up a new post.
Come
visit my Facebook page and Like me!
See me on Google Plus
Linking up with:
Green Willow Pond
Crafty Allie ,
Skip To My Lou,
Keeping it Simple
The Girl Creative,
Between Naps on the Porch