Showing posts with label DIY project. Show all posts

Friday, October 3, 2014

Gallery shelf for Kitchen

Many of you have probably seen the gallery shelves in stores like Pottery Barn, and seen lots of bloggers DIYing them too. I have seen multiple tutorials on them, but the first I actually read was Ana White's tutorial when I bought her book last year. I thought to myself, that is something that is so easy and has a big impact...... I have to build one.

Well, it has been a while, but I did build a 6 foot long one. It was very easy, but took me a little longer than it should have because I had to cut my own boards. Being the frugal thrifty gal that I am, I did not go buy pre-cut 1 X 3's or 1 X 2's. That is because I had a 16 foot 1 X 12 board in the garage that I wanted to use. It would have been much easier if I had a table saw. Maybe I should ask Santa for that this year!!! So I had to measure and use clamps to set up a ledger to run my circular saw along so that I had a straight cut.

So after all the setup, I actually cut my board as 2 3/4" strip for the back and bottom. Then I had to cut a 1 X 2 so I cut that at 1 1/2" wide, (for the front) as I did not want the front lip to be too large if I had cut it at a true 2".

Here is a finished picture. I decided to paint the wall a color (below there is a before that only has the flat builder's paint....yuck...). It is the same as the bathroom where I showed you how to plank a wall, and the back of the Billy Built in unit. The other walls will be a neutral color that is yet to be determined.....


And a reminder of where we started....


I used wood glue and my nail gun to put it all together. After sanding, I painted it. Then I installed it finding the studs in the wall and using 3" screws through the back and into the studs. This baby is not going anywhere!


Here are the dimensions and a close up of how they go together.


Here are some more pictures from different angles. You can see it is NOT perfect. I could have sanded the ends a little more. But I did not. I could always do it now..... And anything that I place on the shelf will cover the screws and any other little imperfections!


I just put the chalkboard menu and cork board back up. I added the dry erase board, which is not finished yet. I need to frame it out. Or I may do something different using clipboards....not sure yet....

This is where you come in. I need help with this space. I don't know what to do above it. It does not feel finished.....

Should I:
1. Add another shelf - same size - above it. Maybe put plates on it, or wooden platters etc?
2. Put some sort of salvages molding, that is purely decorative?
3. Make some sort of sign, or two or three, to hang above in a row?
4. Any other ideas?

Please send me and email, or comment below, what you think I should do. I am at a total loss. Could be pregnancy brain, but I need some help!!!!

I can NOT draw on photos - but this line depicts another shelf above the current one, just to get a visual. I think I like it. Maybe...


Here is another before and after just because....


Thanks for stopping today and have a great day! And don't forget, I need some ideas!!!!


Linking up with: The Pin Junkie, Miss Mustard Seed, Redoux Interiors, Serenity Now, The Charm of Home, Craft Dictator, DIY Vintage Chic, Thrifty Decor Chick

Wednesday, April 30, 2014

DIY Shelf for bathroom storage

As if I don't have enough projects going on right now....... I decided to build a little shelf for storage in my half bath. I have a pedestal sink in there, so there is no where to store toilet paper, soap, extra towels etc.....

While browsing through my awesome book, The Handbuilt Home, by Ana White, I found the perfect solution. I also had a ton of wood scraps (as usual). All I needed to buy was a little cove molding. Here is a picture of the unit from Ana's website.


Mine is slightly different in that I used cove molding, instead os shoe molding. You can tell when you look at the top, and the base of the unit when comparing the picture above, and my picture. I also painted the underside of my shelves a tan color, while the rest I painted white. I did have to caulk a lot and the middle shelf of mine is crooked..... Learned my lesson.

Here is the finished product hanging on a wall (not the half bath wall, as intended)


When it was done I brought it into the half bath and had hubby hold it against the wall and it looked too big! It is a small room and it just did not look right at all. So I decided to hang it in our master bath in the tub alcove area. It is a much bigger space, and it looks great. Bonus is that you see the side of it when entering the room, so you don't notice the middle vertical board that is not plumb. You can only see it if you are standing in the tub, looking at that wall! Perfect!

Here are some photos of the process. I followed the plans in the book but did not use pocket holes. I can't figure out my Kreig yet.... and have NO patience.... I used a nail gun.


Hope you like this project. It was not difficult, but you need to use power tools for it, unless you had everything cut at your hardware store. I did 3 coats of paint. One coat of primer, and 2 coats of paint (using a free sample can I had). I did use caulk in some spots, but used the wood filler for all nail holes and around the cove molding.

Good Luck on all your projects!
Check out this project and photos and glimpses of upcoming projects on my Facebook page.


I'm linking this up with: Green Willow Pond, Craft Dictator, The Pin Junkie, Miss Mustard Seed

Monday, April 22, 2013

Jute wrapped Letter

I have been working on a little gallery wall for the boys room. I have a letter for each of them. Actually the A for my oldest will be redone as it was originally done when he was just a baby. The letter C for my youngest is new. I decided to cover the C with jute. I like the texture and the color goes well with the mostly browns and greys in their room.

I get these paper letters from Hobby Lobby. I think they are $2.99 without a coupon.

I started by covering the ends the opposite way I was going to wrap the rest of the letter.


I just cut small lengths and hot glued them on.

Then I started my wrapping of the jute around the letter. I started in the back, gluing it in place. I used the hot glue some, but not entirely around where I was wrapping. Just enough to hold it. I had difficulty when I got to the corner. What I came up with is shown in the photos below.

1. I divided the corner into 2 sections.


2. I cut small pieces and put 2 on either side of the center line and then worked my way in from the edges.


That last photo shows how well all the ends were hidden. No tricks, just glue and putting the puzzle together!

Once I figured this out, it was smooth sailing from there. Glue....wrap....glue...wrap.....break up fight between boys....glue....wrap.... you get the point!

Almost done......


All done! Easy, but it did take some time. You can see I was drinking coffee and playing with the boys at the table while I did this. If being a mother had a job description it would include, "Must be an excellent MULTITASKER".


I bought this frame at hobby lobby for $4.00. It was a tabletop frame but was missing the back and the glass. Perfect for me! I would not have spent $4.00 if I was going to have to paint it (that is true!) but I loved the color for their room and was planning to use it as is. My idea is to hang the C on the wall inside of the empty frame. Like This......


Happy Monday and have an excellent week!


Linking up to:
DIY Show Off
I Gotta Try That
Create with Joy: Live with Passion
Keeping It Simple
Between Naps on the Porch
TDC Before and After

Saturday, April 13, 2013

Wall Ruler

Hope everyone is having a great weekend. I am enjoying doing my thing while the boys all watch golf! Everyone in the house is happy....

In my house growing up we had a door frame where the height of my siblings and I and ALL of our friends are recorded. It has never been cleaned off and my parents have lived there for almost 30 years! It is so fun to go visit them and read the wall and now my boys want their height recorded there too. I hope they never move, or if they do they will have to take the door frame with them!

I have my own version of this. It is not my idea, in fact I have seen several different blogs and a magazine with pictures of this. This is my version and how I did it.


I started with a scrap piece of wood - I have mentioned before that my scrap pile is really pileS and I have lots of stuff :-). It is a piece of pine with lots of knots which I was fine with. It is a 1 X 10 in a 6 ft length. Which means it measures 3/4" x 9 1/4"...... I remember my Dad explaining that to me when I was in junior high and it did not make sense then and it still does not.... anyways...it had been on the wall as a shelf that the previous owner installed. That is why some areas look lighter. That was against wood and not exposed to air. The other side is painted white and I did not want to use that side because it would be too much work to strip the paint. If I'm being honest!!!


I sanded it down and then cleaned it up. I used wood conditioner, which I rarely use, because of the discoloration in the wood. I also used a new stain color for me. Dark Walnut is what I chose. It is a little blacker that I thought it would be. Almost with a charcoal or ashy undertone. I usually prefer something that has warmer undertones, like a honey color, but I like this too.


Disclaimer: I am just an itty bitty newbie blogger and do not have any products I sponsor (or sponsor me??)... I just like to share what I used and how it worked, or did not work

So I applied the wood conditioner and stain as the directions on the can state. I used a clean rag (an old white cotton shirt cut up) to apply both. I also worked in the garage for ventilation purposes. After letting it sit for a day or so (cause I was working) I brought it in the house to add all the lines to it. I love the fact that when I walk into the family room carrying a 6 foot board and sit on the chair with it across my lap my hubby does not make a peep: no questions, no reaction, no raised eyebrows or funny looks no nothing. I guess he just knows me well!! I used a pencil and ruler to put the lines on, then went over them with a black sharpie. Yup, no painting......just a sharpie. I printed out numbers 1 - 6 in Microsoft word. I used 175 size font in American Typewriter. Then traced over the letter to make a slight indent (pine is very soft) and then colored it in. That is it.


The wood is far from perfect....there is a piece missing from the bottom below the 1. There is also a random red mark down there too. The stain took darker in some areas (as you can see in the photo above), but I love the imperfectness of it.


I started the numbers where I did so that I can hang it several inches off the floor and will just check the measurements when I hang it so that it is at actual height (if that makes sense). If I started at 1" (a little mark - not the 1' mark) I would have had to sit it on the floor to be an accurate measurement. I want to hang it on the wall and clear the baseboard by several inches and still be accurate height measurement.


Hope you have a great rest of your weekend and Happy Patriots Day to all my Massachusetts readers!!!


Linking up to:
Funky Junk Interiors

Tuesday, March 19, 2013

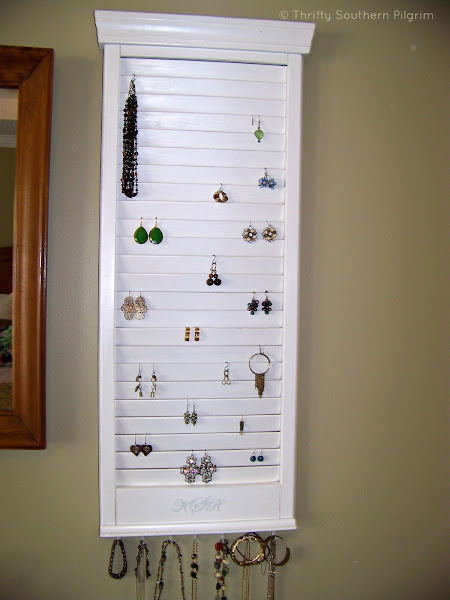
Shutter turned Jewelry Organizer

Happy Tuesday!

This project came out of necessity. I have several jewelry boxes, but the problem is that all my jewelry got jumbled in there and I could never find what I was looking for. I wanted a way to display my options so there was less searching and more time for other things! This is what I came up with. It will only work if you wear dangling earrings, which most of mine are. I can put most my earrings here, my bracelets and my necklaces (not the good stuff, of course).


It started as a $3.00 shutter from the ReStore (LOVE this place). I hung it outside to spray it green since I wanted a white topcoat and was planning on sanding it and wanted a little green to show through. I get many strange looks from passing cars when I have items hanging from the front tree as I am spraying and drying!


This next picture shows that I added trim to the top to hide the shape. Just not the look I was going for. I used chair rail and mitered the corners and used my nail gun and wood glue on edges.
*** Update: this is not chair rail. I think it is left over door frame trim. Whatever it is...it was a scrap piece from my pile that I grabbed because it fit!!


I added a monogram that I painted on the bottom.


I had to purchase some "S" hooks from the hardware store to hang some earrings that did not fit and a necklace that was too bulky for the bottom.


The hooks on the bottom are just simple cup hooks that I screwed in to hang bracelets and necklaces. I also added a little scrap of cove moulding to the bottom.


There you have it. A really easy idea for a jewelry organizer.

Thanks for visiting!


Linking up to:
Not Just a Housewife
Home Stories A to Z


Savy Southern Style
The Shabby Creek Cottage
Miss Mustard Seed
Someday Crafts
TDC Before and After


Funky Junk Interiors: Old Shutters