Showing posts with label staining. Show all posts

Sunday, November 30, 2014

Craigslist Chairs Redone

Hello, I hope everyone had a great Thanksgiving and was able to spend it with some family and/or friends!

Today I am going to share a project that has been completed for a while, but again, with baby here it has s..l..o..w..e..d.. me way down! So, I am just getting to putting this post together now.

If you have been to my blog before you may remember these chairs from a Thrifty Finds Friday a while back. If you are new here, WELCOME - I am glad you are here. You can read about the chairs and price here.


The first order of business was to scrub these babies down. It is hard to tell in these photos but, they had mold spots on them. It was not difficult to clean them, it was just a little bit of a cardio workout! I scrubbed so hard my heart rate was elevated the entire time I cleaned these! I just used warm soapy water and a scrub sponge, and some good ole elbow grease.

Then I left them outside to dry thoroughly.

Next I took off all the seat and got to work on them. They were a light wood which does not go with any wood tones in my home, so I sanded them and stained them.

Here is a closeup of a seat before I stained, and after I sanded it.


Then I used the same stain that I used for the kitchen table when I stained it years ago (this is the table my chairs are going around). It is the color Java in General Finishes stain. Below is a picture of what the chairs looked like after one coat of stain. It looks very streaky in this picture, it was not so streaky in real life. It was even less so after 2 coats.


Here they are all balanced on paint cans drying!


I did 2 coats of stain and 3 coats of poly.

I have no pictures of me spray painting the chairs. But I used Heirloom White to spray these chairs. I sprayed them upside down first, then right side up. I used lots of coats of very light sprays, that keeps the paint from dripping. This came in a Matte finish, which I don't like on furniture, so I sprayed a poly on once the white had dried. When all the painting was done, I put the seats back on the chairs. This is how they look around my table. I love them and I think they came out so nice.


Did you notice the white front door in the background? That should be black by then end of the week. If all goes as planned!

The blue/gray wall in the background with the white gallery shelf you can read all about on this gallery wall post.

If you are interested in the wall planking you can read about it on the planking the kitchen wall post. Or read about the bathroom wall planking here.

Next up: I am working on wainscot in the dining room. I am going to do the same style as in our last home. You can read about that here. Oh - and I need to get the Christmas decorations out and put up.....

Please like me on Facebook and get updates there

Thanks for reading and make sure to visit soon!


I'm sharing here today:
Skip To My Lou
The Girl Creative, Thrifty Decor Chick, Crafty Allie, Green Willow Pond, Miss Mustard Seed

Wednesday, July 30, 2014

Stain and French Typography make a Lazy Susan pretty

Hello and welcome to Thrifty Southern Pilgrim. I have been wanting to do this project for a while, but have been distracted by larger projects. Well, I am so happy that I finally did it. I don't know why I did not do it sooner, it was so easy....... It looks great and now I can actually use my Lazy Susan.

I bought this basic lazy susan at IKEA about a year ago, because it was solid wood, and was cheap. I knew I wanted to change the color. I don't have anything this light tone of wood, so I decided to stain it. Here it is before stain.


It was very shiny, so I made sure to start by giving it a good sanding using rough sand paper, then working my way up to 220 grit, to really smooth it out. This is what I used as a pre-conditioner and a stain.


After 2 coats of stain and a very light sanding it was much better.........but not done yet!


I wanted to add some old character to it. I love all the french typography (and everything actually) that The Graphics Fairy has on her site. So I browsed her site and decided on this.


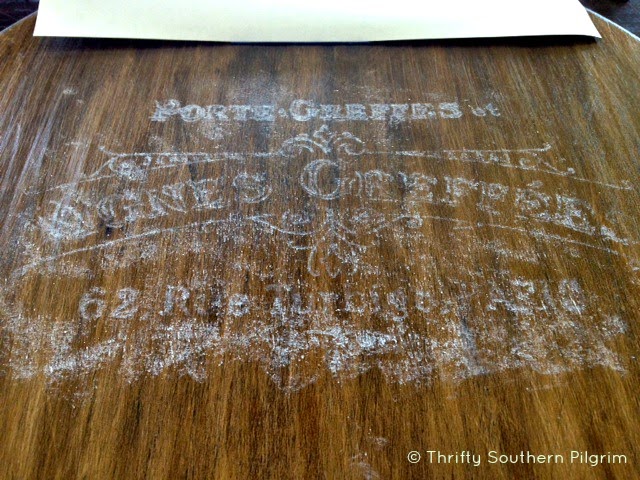
To transfer it, I used a technique I have never used before, but found on her site. I rubbed white chalk all over the back of the piece of paper from my printer. Then shook off all the excess chalk dust and centered the paper on the lazy susan. I taped it down to make sure it did not shift and then used a ball point pen to trace everything. This took me the longest, but really only took about 30 minutes. (I did get a killer hand cramp though!!!!)

This is what it looked like when I took the paper off.


I used a sharpie to trace over the chalk!


I had to use several sharpies because the tips would get some chalk on them and it would not work as well. I just kept going over it until I got what I needed. Then I used Miss Mustard Seed's Antiquing Wax over the entire surface and here is the finished result. What do you think?


One more time - because who can resist a Before and After?:


Let me know what you think! Have a good ending to your week and stay cool.....


Linking up to: Bloom Designs, The Dedicated House, Beyond the Picket Fence, Thrifty Decor Chick Beyond the Picket Fence

Thursday, May 22, 2014

Painted and Stained Craigslist Dresser

I bought this little dresser from Craigslist, just a couple of weeks after we moved in to the new house. So, it sat in my garage while I got more important things done, like unpacking!


The poor thing looked nothing like it does now. It was all a lighter shade of brown. Nothing exciting at all. There was also a lot of wood damage to the top and to some portions of the sides at the bottom.

I have just realized that I never took any before pictures of this dresser. How is that possible? My brain was way to overloaded during moving time, and my husband was away right after we moved. That is my excuse.....

Anyways, although it is not my style, it was a well made piece with dove tail drawers, and solid wood, and I thought it was a little interesting. Mainly, though, it was going to fit perfectly in the space I was intending it for!


The top of it was in rough shape. There had been some patch jobs in the past, and the finish was bubbled in a large area. I did a major sand with my little mouse smoothed out the finish. I chipped away the old patch jobs, which I think also involved glue for some reason...... Then I used stainable and paintable wood filler to fill the patches. It took me at least 3 coats, with sanding in between, to get them filled and smooth.

Here is a close up of that area. I was dissapointed with how the "stainable" wood filler looked. It did not take the color well and looked like sawdust. I thought about just painting the entire thing, but that was too much work. I needed to start using it ASAP. I have NO.PATIENCE....at...all...


One area is mostly covered by a little lamp, and the other area in the front does not bother me as much as I thought it would. Maybe that is because it is between 2 chairs and is not something that you walk by and look down at, as you would in a foyer for example.

I switched out the knobs on the top 2 drawers for glass ones from Hobby Lobby. The metal post that you can see from the front was silver. I just used a little Rub N Buff to change the color to gold. Yes, I know I ruined the finish by having larger knobs on before I found these...... I promise it is not as noticeable in real life...


The hardware for the bottom 3 drawers is original, and was hideous. The center portion had a faux wood paint treatment on it. The ends were dull and dark. With my dad's help we sanded them to ready them to accept spray paint. When we did that we found that they were shiny gold underneath. I was planning to spray them gold..... so...... we soaked them in paint thinner for about an hour. I kept checking them and brushing off the paint with an old toothbrush. Eventually, I just used some fine sandpaper and it took all the old paint off. Next, I used Brasso to polish the handle and end part, getting all the old black dirt off. I love the finished result. Antiqued gold! Just what I wanted.


Here are some more angles of the dresser. I love how it turned out and it provides a ton of hidden storage.


I hope you like the dresser as much as I do. I promise I will try to remember to take Before pictures for the next project!

Today I am linking up with these great blogs: The Craft Dictator, The Pin Junkie, DIY Vintage Chic, Miss Mustard Seed, Southern Hospitality, Green Willow Pond
Confessions of a Serial DIYer

Have you liked me on Facebook yet? Or have you subscribed via email, so my new posts all get delivered to your inbox? You can subscribe on the bar on the right.

Have a great Memorial Day weekend everyone!!!!