As promised.......this post is about the details of the built ins. If you did not see my reveal post, you can see it here.
For my built in's I used 7 parts of IKEA's Billy unit, plus 6 doors. Here are all the parts that I purchased:
Billy Bookcase, white (I used TWO)
Billy Bookcase, white (I used one in the center under TV)
Billy Height Extension Unit (I used TWO)
Billy Bookcase, white (I used TWO of these, on either side of the one under the TV)
Billy Doors - that is not what they are called, I just can't find the link. They are all the same size and I used SIX.
(The above are not affiliate links, I just thought it would make it easier to know what I used since the Billy system has so many options)
The first thing I did, was measure from the center of the wall (also the center of TV) and cut the baseboard away from the wall on either end where the built in would end. The Billy units have a notch in back for baseboard, but our baseboard is taller and would not fit in that space. I wanted them to sit flush on the wall so had to remove the baseboard. I used my dremel to do this.

I had wanted to wrap the baseboard around the front of the entire unit, but the way the doors cover the bottom, I could not figure out how to do that. If I left the doors off it would have been easy.... But I need the hidden storage for LEGOS! I kid you not..... Anyways, I was mad about this at first, but have since gotten over it.
This unit was being installed around a flat screen TV that is mounted on the wall, with the cords that go down the wall in a tube, to the outlets near the floor. My hubby was very concerned about blocking access to the pile of
To give the cords space, I decided to have the middle 3 units (the shorter ones) stick out from the wall a little. This gives space for the cords, and also gives the entire unit some dimension and personality by having the center stick out about 1 3/4" from the two flanking bookcases.
To accomplish this I mounted TWO 2X4's to the wall, drilling into studs. One was down low, and one at the level of the bookcase top.

I then installed all three units up to these boards. All three are secured to the wall using L brackets. I did not put any trim on the fronts because I did not want them to be connected together. The middle one just needs the L bracket unscrewed, and then it can slide right out, allowing access to the cords.
It is a good thing I did this too, because there was a problem with the sound bar and it had to be returned and exchanged, and hubby was happy to be able to just slide out the center unit to gain access to the cords! Win - Win!
I had to notch out the 2X4 to allow the power cord for the sound bar to drop to the outlet. ** Pay no attention that the photo says it is the TV cord. It is not..... I am easily confused with electronics. It is the power to the sound bar.

Here is a picture before the extenders were added.

Don't ask me why there is a pirate ship on the top???? All I know is, I did not put it there!
Here is after one extender was up. What a difference!

Both the bookcase, and the extenders are secured to the wall and are not going anywhere.
I decided to paint the backs after this was all put together. I would have been a LOT easier to do this before I installed them, but it still worked. Some day I may add beadboard or wallpaper to the backs, but for now I like it painted.
I added some scrap wood to the top of the units, allowing a small (1/4") lip for my crown molding to sit on. I did not do this until I bought crown molding, so I could make sure I installed the scraps in the right spots. The purpose of them is to have something to nail the crown into.

I used my nail gun to install the crown, but you could use finishing nails too. Most my corners were a good fit, but when they are not (like in photo below) caulking fixes EVERYTHING!

There was a small gap in the front after I installed the crown, that needed to be covered.

I decided to use rope molding, as it was the perfect size, and I have used it before on our old kitchen island and love the look. I just cut to size, used wood glue, and nailed it in.

I had to do some research to find out about matching paint colors so that the crown molding would look the same shade at the unit. I had no intention of painting the entire thing! I found this photo from Decor Chick that had the formula that worked for her. I just took my phone to the paint store with me and they mixed it up in a semi gloss.

I have to say, it is not an exact match. It is a little whiter than the rest of the unit. I may try to tweak it some and repaint. But maybe not...... it is pretty darn close that it does not bother me enough to delay another project. Maybe someday when my list is done, I will do it!
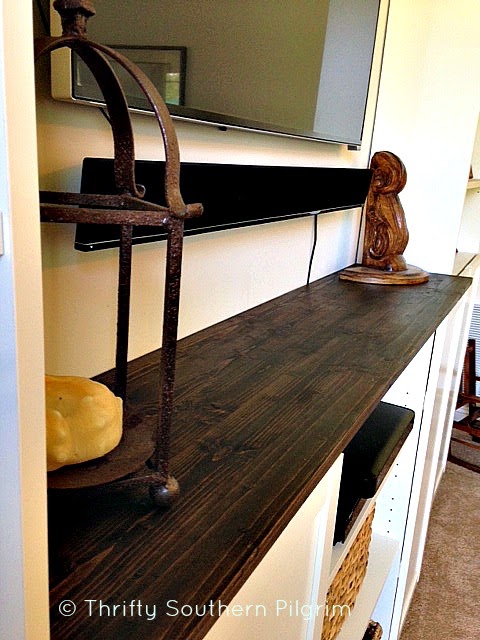
The final thing I did was to add a board across the top of the three center units. I wanted to do this to add a more furniture like look. I also wanted to have some contrast with the dark wood and the white bookcases. AND, it was practical. Remember how I mounted it on 2X4's? Well you could see it and it needed to be covered.
I bought this board from Lowes and cut it at home. Then I stained it using the same stain as my French Winemaker Lazy Susan and waxed it and just placed it on top. I did not secure it because we still may need to slide the center unit out to get access to the cords.


It is hard to tell from this angle, but if you look at the end of the stained board, you can see that is sticks out in front of the bookcase on the end. That is because the entire center portion sticks out about 1 & 3/4" due to the 2X4's I mounted/spaced it on. I love having that little bump out!


And that is it!
Here is one last picture of the entire unit. See the reveal post for more finished pictures.

Please let me know if you have any questions or I would love if you shared your Billy projects!