Saturday, November 30, 2013

Pinecones and Burlap and Glue

My oldest son and I had some time together the other morning so we went on a hunt for nice pine cones. He was so helpful and even was helpful when we went to Hobby Lobby to get some burlap for them! Last year I made a very easy door hanging with minimal supplies. Here is my front door Christmas 2012.


I got the idea for the sign from a blog (I think.....) and I can not remember where I saw it. If anyone knows, please comment and let me know so I can update. Anyways - have you noticed that the bottom of the "g" is missing? There was no way I was going to repaint the whole thing, and my husband did not notice it. But now I went and told you all!!! Now you know!

This year I am not making another sign, and my sign in in storage (read this post for more explaining). My project today includes pinecones, burlap, fabric, a glue gun and some crummy scissors. I bought the burlap and fabric from Hobby Lobby spending a grand total of less than $4.00. The gluestick I have and the pinecones were free.

This is what I did with my project.


I started out with strips of burlap (cutting with children's scissors test my patience - but guess what - no scissors!). I put a glob of glue on the flat end of the pincecone and pushed the end of the burlap strip into it. Then I put another glob and folded the burlap over and angled it so it did not fold over perfectly. Then I put another glob, and repeated again. This made 2 small folds/ loops that I liked at the top of the pinecone. Then if I needed to I put a thick line of glue in the center top of my pile and stuck the burlap there so that it would hang from the center (and not off to the side).


While that dried I made fabric strips. I think this was 1/4 yard of cotton fabric. To make even strips you just rip. Yes, it is that easy. I was not going for perfect edges so this worked for me.

Step 1: Cut a small slit where you want to start your rip.


Step 2: Hold both sides of the slit and you guessed it...... RIP. Easy Peasy.


This picture shows you the entire window. I apologize for the lighting but I wanted to show you that I have 6 pinecones in 2 clusters of 3 (odd numbers always seem to look better in groups like this).


If you have any easy projects I would love for you to share with me! Post a comment!

If you are wondering about the stools. Well...... I am still working on them. Just v.e.r.y. s.l.o.w.l.y......


Have you Liked me on Facebook yet?


I am sharing with these blogs: Thrifty Decor Chick,
Making the World Cuter
,

Thursday, November 28, 2013

Give Thanks

Happy Thanksgiving Everyone!

A few things I am thankful for..

* My family; my husband and my two boys

* Being able to travel by plane to spend time twice a year with my (blood) family who live far away from me

* Having in-laws close, even though they are not my blood family I am so thankful that I have them because they are my family

* My parents who are so selfless and visit us at least twice a year

* We are able to build a new house that will become a beautiful home for my family

* My health - I never take it for granted and try very hard to take care of this body that God gave me

* Friends - so many near and far that make life better

* Coffee - I can't make it through the day without it

* A career that I love

* Not having to work full time

* Chocolate and sugar

* A fun and exciting new business venture I started this year

* Having the courage to do my New Years Resolution from last New Year: to start my own blog!


Images from Plimoth Plantation


Hope you all enjoy your family and friends on this Thanksgiving Day 2013

Monday, November 25, 2013

Easy Christmas Ornaments

I LOVE Christmas time. I love the hustle and bustle. I love Christmas music. I am getting used to not associating Christmas with cold weather and snow........and that is kind of nice. We do travel at Christmas every other year and get to be in the cold and sometimes the snow. However, even when we travel we are in the South for the preparations. I love playing Christmas music all day long and my house smelling of baked goods and breads and spices. One thing I always do, and love to do, is make gifts. Some years I make more than other years, but I always makes some things. This year is different however because we are in temporary housing and due to an unexpected building delay (are they ever expected!?!?) not only are we not in our house now but we need to move again for 3-4 weeks before our house will be done. So we have no Christmas decorations - they are all in storage. I went to one of our storage units today and looked at the bins that house all my Christmas decorations. I almost cried, but I didn't because my son was with me and we were on a mission to find something else. I want to make the best of this year and give them a fun Christmas season no matter where we are or how un-Christmas our very bare condo looks now. I am just thankful that we have Christmas items, even if they are in storage, we do have them, and we have each other.......

Which that leads me to this post......

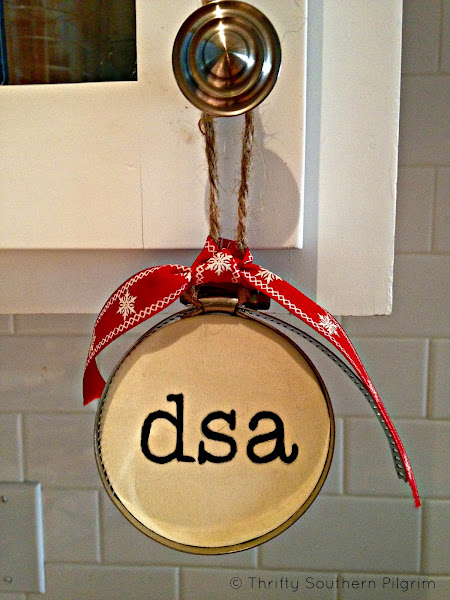
I needed a project that was quick and easy with minimal supplies needed from me - because most my things are not accessible now. I found some ornaments that Jaime from That's My Letter (whose blog I just adore by the way - she has awesome projects) did a while back. The supplies were minimal and the supplies were bought while shopping at my favorite stores; Hobby Lobby and Home Depot.

You can read Jaime's tutorial here and I won't repeat it as she does great tutorials. The only difference is how I transfer my letters. I can't do it the way she does, it does not work for me. Maybe my eyesight is worse than hers! I always use the transfer method (you can read more about my transfer method here) and it never fails me.

These literally took me less than 2 hours for FOUR. That is over-estimating!


The other thing I did not do like Jaime was cutting the metal "tail" off. Can you guess why........ Yes! I have no tools! I do know that my tool chest is in the POD so there is no way I am seeing it until we move in.

I'll be back with some other small easy Christmas DIY's.

Thank you for reading, have safe travels this Thanksgiving Week and a great Thanksgiving.


I am linking up to: Between Naps on the Porch, The Dedicated House, Home Stories A to Z, Keeping it Simple, Thrifty Decor Chick

Friday, November 15, 2013

Thrifty Finds Friday #5

I have been searching for counter height stools for our new kitchen island for a while. I have been looking for 3 stools, but bought 2. When I show you them, you will understand why. I went into the Habitat ReStore looking for a table and found two stools. When I looked at the price tag I was not sure if they were $12.99 OR $2.99. It looked like the "1" was crossed off. When I asked an employee he thought so too - so........ I got them for $2.99 each! Eeeeekkkkkkk!!! I literally ran out of the store with them!

They are so comfortable and sturdy. I plan to paint them a light color, since the island base will be dark brown. I also need to stain the cane. Luckily, MMS had an awesome post recently, with a tutorial, for this very thing! I will be working on these stools soon, and will share when I do. I already bought paint, I'm thinking of using a brush..... I'll let you know how that goes! Could be a disaster....

Here are my finds:

Look at how pretty the shape is...


Of course at that price, they are NOT perfect.....


Look at how perfect and beautiful that cane is!?!? I'm in love, I don't care how much work they are.....


Here is my inspiration:


Miss Mustard Seed

Check back next week to see the finished stools. At least, I hope to have them done by next week.

*** Update: One stool is done. Check here to see how it turned out! ***

If you aren't a subscriber, you can do that on the sidebar and all new posts will land in your inbox.

Like me on Facebook and you will see new post links there too!

Happy Friday!

Tuesday, November 5, 2013

Baby Burp Cloths

I think most people understand the importance of burp cloths for infants, even if you have never had children of your own. These little cloths get used almost hourly and get tons of abuse use. They get washed at least twice weekly, possibly daily, and can usually be found all over one's home, car, and shoved in any bag available.

The problem is most people do not buy themselves any cute burp cloths. I like to think the cuteness helps cover the job they are actually doing; Cleaning up 'burps'! For this reason, I love to make burp cloths as gifts for new mothers. I have showed how I made some adding fabric and ribbons in this post. I have made dozens this way and every one tells me they get lots of use!

Today I have something a little different in mind. If you are new to my blog, we are in temporary housing while our house is slowly being built, and I don't have all of my things. I don't have my sewing machine or my huge stash of scrap fabric. So I had to be a little creative when deciding to make some burp cloths for two mother's with new little boys. My post about a month ago where I showed how to monogram napkins using fabric paint inspired me to try fabric paint on the burp cloths. I really did not think it would work. I buy the thick kind of cloth diapers to make my gifts, and I thought the paint may just soak in and not leave clear images. I am happy to report that I was wrong! I think they turned out darling and I can't wait to make more..... This is what I made.


Here is how I made them:
I printed out a picture of a crab, just because.... I also printed out a letter L and H, for the first initials of the two little boys. I then traced it onto my freezer paper, with shiny side down and tracing on the top. I kept the freezer paper over my cutting mat and using the grid lines for reference made marks so that I could use a hole puncher and have a straight line of holes.


Then using my cutting mat and my exacto knife, I cut out the inside of the crab and letters, and hole punched along my grid.


Next, I placed it on my washed and ironed diapers. I adjusted the crab and letter to where I liked and - with the shiny side down - I ironed it to my cloth, paying close attention to all the edges of the image and letter. I also ironed the strip with the holes, lining it up along the bottom edge of the cloth.

Once I was sure all the edges were ironed down tightly, I started painting. I used small bottles of fabric paint purchased from Michael's (yes with a coupon.....). I always paint from the outer edges IN, that way I avoid bleeding under the edges. Then I go around and fill in the inside. This took a little more paint because it did soak in to the thicker fabric in the center, however, it did not take as much as I thought it might.


Once everything is dry, then carefully peel the freezer paper back, being careful not to rip it if you are going to use it again (which I was).


This is a close up of the edge and the dots. You can see the edges are not completely perfect, but they look great considering it is a loose weave fabric. I also love the shimmer in the red paint, I was not expecting that and love it!


A couple more shots....


I hope the babies like them too!


Happy Painting!


Sharing at another Thrifty Chick blog:
TDC Before and After


Please like my Facebook page if you have not done so already! I have just started this page.

The Girl Creative, Stone Gable, From My Front Porch to Yours, Imparting Grace, Have a Daily Cup of Mrs. Olsen , Green Willow Pond, Thrifty Decor Chick

Friday, November 1, 2013

Thrifty Finds Friday #4

Happy Friday Y'all! Did everyone have a great time last night trick or treating? I love seeing all the kids dressed up and having a great time.

I have one item to share with you today. If you have read my blog before, maybe you remember the post about my yard sale brass light, that I did a little changing to. You can read about my light in this post and below is a photo of the light.


Well, I found a bigger, better brass light! I found it at a local thrift store and scored it for 50% off for a grant total of..... $15. Whooo Hooo! This baby is so pretty and has so many details that I love. I plan to paint it just like my other light and hang it centered above my new island.

Below are photos of my new light. It is not cleaned and not spray painted yet. I hope this time I can keep the glass in the light!!! It is going to look so pretty hanging over me new island!


Hopefully that will be a project that can be done quickly after moving in. Just a little spray paint and some connecting of wires. I am having the builder put a light outlet centered above the island, so it will be ready for install!!!

Enjoy your weekend!

Have you liked me yet on Facebook? You can get to my FB page here.