Thursday, March 28, 2013

Adding a shelf in Laundry Room for storage and function

My laundry room is right off my kitchen and is also the way to the garage. There is a small pantry closet in there..did I mention it is small????

I liked to keep extra laundry soap, juices, cereals etc. close by the kitchen and not in the garage. This spot in the laundry room became the place to put these items (because my pantry closet is small). The problem was that it did not look pretty and there was so much wasted space in this little spot.


The photo below shows the after of the same space.


THE DETAILS:
I decided to build a small shelf to hold my laundry soap and also to serve as a hiding spot for all those items on the floor. A large tub of laundry soap is heavy and this would be much stronger than the shelves on the wall were!

I assembled all my scrap wood and built a 3 sided frame with one side attached to the wall and the corner of the other 2 sides attached to a 2x4 for a leg. I had planned on using a decorative spindle for the leg, but wanted the strength of a bigger piece of wood and it was going to be hidden by a "skirt" anyways.


This shows the trim. I just used what I had and what fit and what I thought looked good when I held it up.


I used leftover MDF from my board and batten project for the top of the shelf. I liked the planked look.



I rounded the front corner with my jigsaw to ease it back to the wall.


I kept the edge several inches away from the washing machine for more space to move the washing machine if needed for maintenance, or for a new machine - which of course I have been putting off for years.......

I made the skirt from some material that was once on an upholstered bench and I just love. I gathered the top some and then sewed a strip of velcro on the back of the gathered top. I stapled the other side of the velcro just under the trim I added. This way I can remove the skirt for cleaning if needed.


Now if the door from the kitchen to laundry is open I don't cringe at what I see :)


Thank you so much for visiting me today!

Quick chair update: (from my last post) I have painted it and LOVE it. I used a total of FOUR paints! I have the foam and batting attached to the seat. I found a fabric that I want to stencil - but....... - I can't find a stencil I like. I will show the chair once I completely finish the fabric.


Linking to:
The Shabby Creek Cottage
Hookin Up with House of Hepworths
Miss Mustard Seed
TDC Before and After


Friday, March 22, 2013

Chair Part 1

I found a chair on the side of the road. Of course I could not leave it there but had to rescue it! It has been in storage for at least 6 months. I recently brought it to my garage, along with all the other projects I have going on, to completely redo it.

It had some of the veneer peeled off, one arm was off but the caning was (almost**) perfect.


I first took the pad off and sat down with some needle nosed pliers and a flat head screwdriver. After taking out a bunch of staples I realized that there was another fabric underneath. Then I realized there was a total of THREE fabrics on this chair. All stapled in........ The staples holding the underneath fabric were rusted....


After taking all 3 fabrics off - which I saved to use as a pattern - I realized that the foam was not in good shape. I guessed this since the chair was not very comfy when I tested it. I kept it to give me a guide for buying a new piece of foam.


I also had to fix one arm. That involved a new screw and some wood glue. I forgot to take any pictures of the arm before. Bad blogger, as this was done after starting this blog. oops...

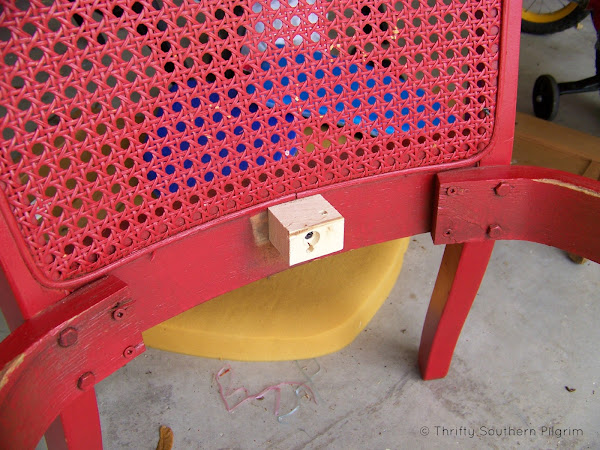
The little piece of wood that was a rest for the back of the seat was loose and I could not tighten it any. So, I removed it, grabbed a scrap piece of wood and made a new support.


I used wood filler in the cracks and then sanded with 600 grit when dry. Next up is to prime with spray paint and then paint. I think I am going with a grey. But I want a brownish and goldish old look to it. Not sure yet how I will accomplish that. I usually just experiment. If I hate it I can always paint over it.

Then the foam and batting and then the fabric. I have not found the fabric yet.

Here is a peek with one coat of primer.......


Hopefully I will be showing the finished chair within a week. Writing it out might just get my butt in gear and get me motivated!!!!

Have fun with your furniture restoration projects!

Linking up to:
Miss Mustard Seed


Tuesday, March 19, 2013

Shutter turned Jewelry Organizer

Happy Tuesday!

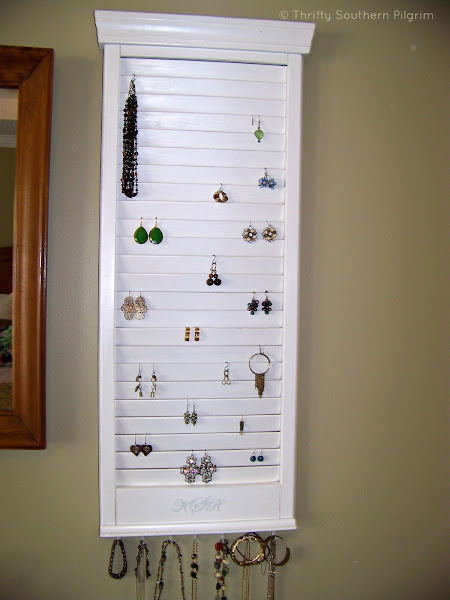
This project came out of necessity. I have several jewelry boxes, but the problem is that all my jewelry got jumbled in there and I could never find what I was looking for. I wanted a way to display my options so there was less searching and more time for other things! This is what I came up with. It will only work if you wear dangling earrings, which most of mine are. I can put most my earrings here, my bracelets and my necklaces (not the good stuff, of course).


It started as a $3.00 shutter from the ReStore (LOVE this place). I hung it outside to spray it green since I wanted a white topcoat and was planning on sanding it and wanted a little green to show through. I get many strange looks from passing cars when I have items hanging from the front tree as I am spraying and drying!


This next picture shows that I added trim to the top to hide the shape. Just not the look I was going for. I used chair rail and mitered the corners and used my nail gun and wood glue on edges.
*** Update: this is not chair rail. I think it is left over door frame trim. Whatever it is...it was a scrap piece from my pile that I grabbed because it fit!!


I added a monogram that I painted on the bottom.


I had to purchase some "S" hooks from the hardware store to hang some earrings that did not fit and a necklace that was too bulky for the bottom.


The hooks on the bottom are just simple cup hooks that I screwed in to hang bracelets and necklaces. I also added a little scrap of cove moulding to the bottom.


There you have it. A really easy idea for a jewelry organizer.

Thanks for visiting!


Linking up to:
Not Just a Housewife
Home Stories A to Z


Savy Southern Style
The Shabby Creek Cottage
Miss Mustard Seed
Someday Crafts
TDC Before and After


Funky Junk Interiors: Old Shutters

Thursday, March 14, 2013

Easter Bunny Chalk Picture

I bought a frame at the local ReStore for $2.00. I could not pass it up. It was gross and dirty, but in good shape otherwise and I loved the details.

Bunny silhouette's have been all over blogland, Pinterest, Pottery Barn and more. I had to have one in my home too. Today, I decided to use my frame for a chalk bunny.


I took it apart and lightly sanded the frame. I painted it a color I had in my garage. I took the print out and just sprayed it with 3 coats of chalkboard paint. Then rubbed chalk all over it. I printed out a bunny silhouette I liked and then I cut it out and traced around it on my new chalkboard with chalk, of course. Then I colored it in.

Total Cost: $2.00

From this:


To this (in about 30 minutes):


Have a great day!

Linking up to:
320 Sycamore
House of Hepworths
Just us Four
Tatertots and Jello
Serenity Now


Someday Crafts

Wednesday, March 13, 2013

Welcome Sign

I guess I like signs! I didn't realize how many I have made. I have posted about the Guest Cottage sign, the Longitude/Latitude sign, the Tooth Fairy sign and now this sign. I also have several more that I love that I have not posted about.

I guess I love them because they are easy to make and I usually don't need to go to the store for anything. I can personalize them for whomever I want to give a gift to, and who doesn't love to get a personalized handmade gift?


This sign was made for my sister in law when she moved into a new home. I picked the colors to go with her beachy decor.

The wood was a leftover piece of old fence board.

I painted the wood Dolphin's Cove by BM. Then I dry brushed a grey over that. I also dry brushed white over that. I just kept going until it was the look I was going for. Once my paint was done and dry I had to decide on my lettering.

I picked my font and printed out my letters on paper and then transferred them to the sign. I show pictures of the way I transfer images in my Tooth Fairy sign post.

I searched for an object to put on either side and finally came up with the seahorse shape. It was one of the shapes on a Cricut cartridge. I simply cut it out with my Cricut to the correct size and then traced around the cutout onto the sign.


Once everything was in pencil I started painting my seahorses and letters. I did 2 coats. I sealed it with wax and buffed it. I love the soft shine that buffed wax gives. It is so soft and pretty.

I put 2 tiny eye hooks in the top and screwed them in. Then took 3 strands of jute/string and braided them. I thought this sign may be outside (under a roof) and wanted the string to hold up to the weather. I did not have any thicker string and thought this would give it good texture and hold up well.


Sorry I don't have any during photos. However, I thought it was too cute not to share!

Thanks for visiting me today!


Linking up to:
Savy Southern Style

Monday, March 11, 2013

Sew easy: A skirt for a birthday girl

My niece is turning 5 today! Having only boys in my house, I love any opportunity to make something for a little girl. And this little girl loves anything and everything girlie!

For those of you who can sew, if you have not checked out the blog Dana Made It you MUST do so. Dana's blog is full of wonderful tutorials, and she has a boy and 2 girls so there is something for everyone! I have made many of the boy items, including pants and shorts, and her tutorials are wonderful and easy to follow.

I used the market skirt tutorial for my niece.


I measured my niece's waist one day and then used the information at the end of the tutorial to adjust the size for her.

I followed Dana's tutorial, omitting the pockets, and I added a little lace at the bottom edge. To do this I simply put right sides together and sewed in a straight line. When done I flipped the lace down and ironed the seam flat.


Just pair it with a cute shirt - you can even embellish the shirt - and you have an adorable little outfit for a birthday girl!

Kristina


Linking up with:
Cutesy Crafts

Sew Much Ado

Thursday, March 7, 2013

Painted Kitchen Cabinets and reworked Island

I want to show our painted kitchen cabinets. From the moment we bought the house I hated the oak cabinets and wanted to paint them, but had many excuses not to. I really wish I had done it long ago (before kids) because it really was not difficult. It was time consuming related to waiting on everything to dry the correct amount of time. Not hard though.

Our cabinets are builders grade oak. We also don't have many, which is why we purchased a fee standing unit that matched out cabinets from Home Depot. We placed this on the wall where the thermostat was, once I moved that. That is another horrible and hot attic experience...... Anyways, we I did this when I started painting the cabinets. I'm not sure why I keep writing "we". Hubby leaves me alone with my projects and lets me do my thing. He helps sometimes if I need it or ask for it, but mostly they are my projects that I do.

Back on track.....here is a shot of the day we moved in. BORING. No trim and no knobs. That first year I added crown moulding to the top of the cabinets and that made a big difference (but not enough).


This shot shows that same area with the cabinet installed.


It is amazing how much storage space this gives me. I can fit large items like my bread-maker and crock pot in bottom. The drawers hold smaller items and the top has shelves that I keep cereal, snacks and cookbooks on. My boys just push up a little step stool and help themselves. So easy.


The next shot shows the pantry on the left - it is not warped as it appears in the picture - promise. I apologize for not cleaning off the fridge for this picture. It is not pretty, but that is real life and gives our home its personality. We do have little kids living here!


The next several photos show the details.

I primed all cabinets with OIL BASED primer. This was a pain to clean my paintbrush, and stunk, but I think it gave the paint a stronger bond and I have about 2 chips. That is it, even around knobs.


I like to use brushes to paint. I do not like to use rollers (except on walls). That's just my preference. And I always use Purdy brushes. They cost more because they are better. If you take care of them they will last YEARS.

I painted the cabinets Benjamin Moore Snowfall White. It was a water based semi-gloss that my local store recommended specifically for cabinets. The color is a very pretty, soft white without being off white. I was worried about my appliances being white next to the cabinets, but I think it looks fine (stainless would look better....someday..).

I installed MDF pre-primed beadboard on the cabinet ends, around the stove area below the hood vent, and on the sides of the pantry unit. This was thin enough to sit on the sides and be flush with the cabinet edge.


I installed a small moulding around the bottom of the cabinets and around and up to the vent. I think this gives it a much needed finished edge.

I also used 2 brackets for the upper cabinets. I simply hot glued these to the cabinet bottoms with the hopes of needing to easily remove them for a new backsplash in the future. These were purchased from Home Depot for $9 each.


The knobs and handle on the pantry upper were purchased from EBay


The cup pulls that I love were found at my ReStore. They were a find at 75 cents each! Yes, I said 75 cents each!!! They were new and very heavy. I thought I would like the silver look, but after the cabinets were white realized that I did not like it. I could not find any in ORB so decided to spray paint my silver ones. I am glad I did, they came out great and have not chipped or scratched at all.


Here are a few pictures of my kitchen island. I bought it unfinished over 7 years ago. It was white until I painted the cabinets white. It is now a red color in a milk paint. I can't find the can now to check the color. I also added trim to the base and beadboard to the back and sides. The top is a butcher block purchased from Ikea. They have the best deals on butcher block. Worth the 2 hour drive!


One last picture of cabinets. I can't wait to do counters and backsplash but this is where we are for now.....


Phew this post was long......

Always, thank you for viewing and visiting!


Linking up to:
House of Hepworths
The Shabby Creek Cottage
The Shabby Nest
Miss Mustard Seed