It is official. We no longer own or reside at our home. I was so busy packing that it did not hit me until a couple hours before the closing (and the walk through) and I just started crying. I am so excited for where we are going, but we have so many memories from that home. I put so much work and pride into making our house a perfect home for us, it is sad to hand it over to new owners, whom we can only hope will love it as much as we have.
So when our house quickly went under contract we knew we would have to be in temporary housing for a while before our new home is ready. Luckily for us, we will be staying with family until we can move to our new home. This also means that we will not need to take most of our furniture to our temporary housing. But where should we put it? It needs to be somewhere for most likely 5 months, at least......
We researched options, and talked to our friends about it as well. We decided to get a POD delivered to our house and fill it ourselves over the course of 10 days (I am sure my HOA did not like that.....). We got the largest of the 3 sizes. It was 16 feet long. It had a roller door that we purchased a lock for and the door faced our garage and was about 5 feet from the garage door. Unfortunately it was too wide for us to fit a car in the driveway with it, so we parked on the street until it got picked up, the day before we closed. On a side note.....our mail was not delivered for several days due to cars in the road while packing - our mail person does not deliver if the truck can not pull up to the mailbox unobstructed. Really???? We never have any cars in the road and it was clear that we were in the process of moving..... but I digress.....
So we changed our mind (or I did) about us loading the POD........we hired 2 movers from a local moving company and let me tell you they worked hard for their money. Two young men loaded almost all our furniture into the tiny POD. It took them 2 hours to complete it all. I had everything except our King bed unassembled and ready when they arrived. When they were done, it was like a puzzle in there. It was filled to the top and there was NO wasted space. Not all of our furniture fit. Several small tables and a chair were left out.
When they picked up the POD I was holding my breath as the PODZILLA got connected and the POD went back to the truck. It was swinging some and I am very nervous about what we will find when we open the doors. I will update on that once we get it delivered to our new home.
Next we filled up TWO SUV's for at least 10 trips each to the storage unit(s). I was packing the kitchen up at midnight, 12 hours before our closing. After 4 hours of sleep, we returned to our not nearly empty home and got everything done, the house cleaned, and ready for the new owners with 30 minutes to spare!
What I learned from this is that next time we will hire people to empty the storage units and load it onto a truck which will make ONE trip to our new house and then they can unload the truck and the POD all at the same time!!!!
The other thing I learned is that my children can take pictures AND erase pictures on my i-phone. I took pictures of the POD, and video of them collecting the POD, and viewed them this morning, but they have mysteriously disappeared. Hmmmm.... Or I could be blaming them and it was me....... anyways - so sorry for no pictures. I hope sharing our process helps one of you!
I hope to share another July 4th inspired art piece in a day or two.....come back then!

Home Decor, Crafting and the Thrifty Adventures of a New Englander living in the South
Sunday, June 30, 2013
Thursday, June 20, 2013
Thrift Store Canister Chalk "Label"
In the midst of all the packing and chaos I needed to do something under my control.......so I chose to spray paint. Maybe not the best idea, but it made me happy and I needed that! In between packing up items I was running outside spraying and cutting with my Cricut. Thank goodness my husband was not here - it would just confirm how crazy I am going to get as this moving thing gets more intense!!!
A while ago I found 2 little canisters at a thrift store that my 3 year old could not leave without. They were a cute shape, had lids with rubber gaskets that were intact, had little handles, and were UGLY. Unfortunately my little one broke the smaller canister by swinging it around by the cute little handle.....So I only had 1 ugly canister to fix. Here it is a hot speckled, lid-less and handle-less mess.

I wanted to have a chalkboard label, but wondered if I could just use my chalkboard SPRAYpaint in the shape of a label....hmmmm.....so I sprayed the center area with several coats of chalkboard spray paint.

Sorry for the glare. It was still wet.....remember, I was in a rush to get back to packing all my stuff! I'm amazed that I remembered to take pictures!
Next I cut a shape out on my Cricut in vinyl and put it over the dried chalkboard paint. I made sure the edges were stuck really good.

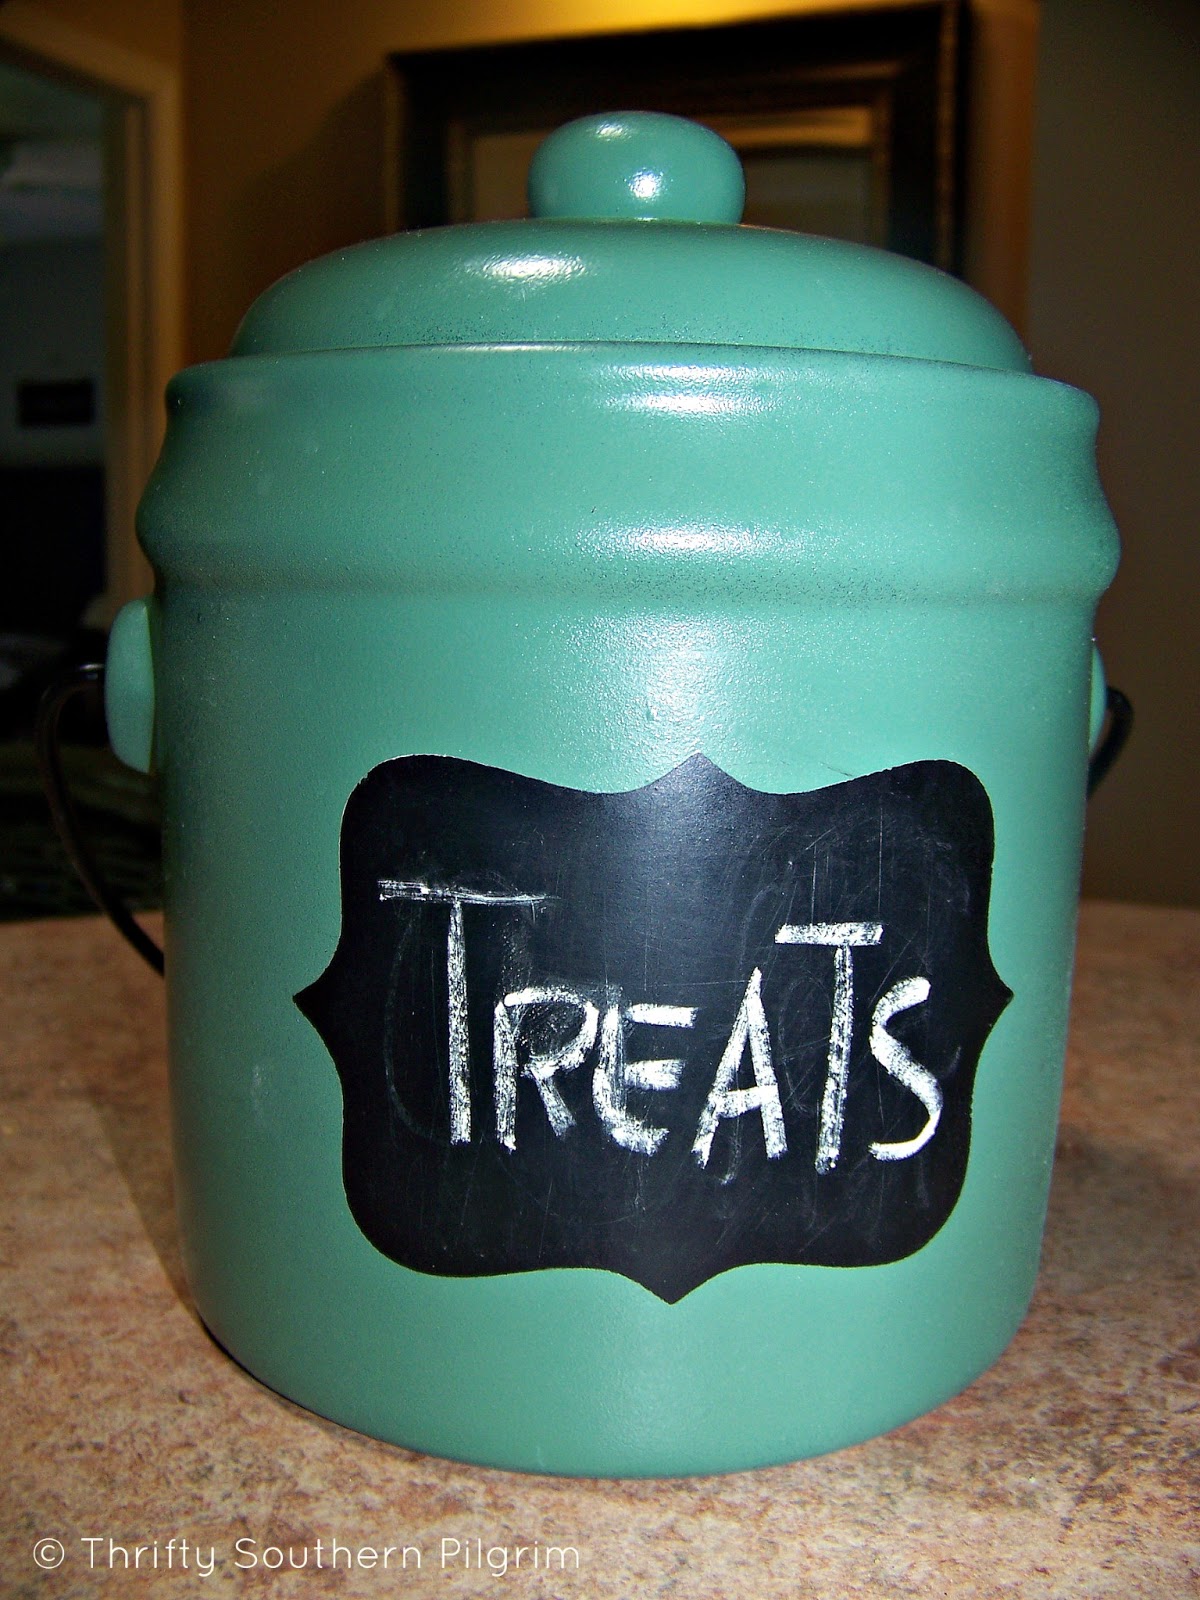
Next I used an old golf club of my husbands (shhhh) to stick the canister upside down on while I held up the stick with one hand and sprayed with the other. I had to do a few coats of paint. Be warned, I could not get the green to look right in the photos. In real life it is not so minty green... After it dried I very carefully got the corner of the vinyl up and peeled it back.

Now I have a cute little canister that I can write whatever I want on it. When the boys asked if there were treats in there for them, I told them it was for dog treats! Not really....but I wanted to squash their idea of getting treats before eating dinner!


I hope you liked my quick little project. A few days ago I went to a local store that carries Miss Mustard Seed paints, and purchased a sample of her Boxwood milk paint, and a jar of Antiquing Wax. I can't wait to use them. I think I will be in big trouble if I try to squeeze this project in before moving day next week!!! I will post about it when I do it!
Have a great weekend y'all!
(I can't help it - that is my favorite southern saying and I use it too much for my northern upbringing.)
I'm linking up with there great blogs: House of Hepworths, The Shabby Creek Cottage,
A while ago I found 2 little canisters at a thrift store that my 3 year old could not leave without. They were a cute shape, had lids with rubber gaskets that were intact, had little handles, and were UGLY. Unfortunately my little one broke the smaller canister by swinging it around by the cute little handle.....So I only had 1 ugly canister to fix. Here it is a hot speckled, lid-less and handle-less mess.

I wanted to have a chalkboard label, but wondered if I could just use my chalkboard SPRAYpaint in the shape of a label....hmmmm.....so I sprayed the center area with several coats of chalkboard spray paint.

Sorry for the glare. It was still wet.....remember, I was in a rush to get back to packing all my stuff! I'm amazed that I remembered to take pictures!
Next I cut a shape out on my Cricut in vinyl and put it over the dried chalkboard paint. I made sure the edges were stuck really good.

Next I used an old golf club of my husbands (shhhh) to stick the canister upside down on while I held up the stick with one hand and sprayed with the other. I had to do a few coats of paint. Be warned, I could not get the green to look right in the photos. In real life it is not so minty green... After it dried I very carefully got the corner of the vinyl up and peeled it back.

Now I have a cute little canister that I can write whatever I want on it. When the boys asked if there were treats in there for them, I told them it was for dog treats! Not really....but I wanted to squash their idea of getting treats before eating dinner!

I hope you liked my quick little project. A few days ago I went to a local store that carries Miss Mustard Seed paints, and purchased a sample of her Boxwood milk paint, and a jar of Antiquing Wax. I can't wait to use them. I think I will be in big trouble if I try to squeeze this project in before moving day next week!!! I will post about it when I do it!
Have a great weekend y'all!
(I can't help it - that is my favorite southern saying and I use it too much for my northern upbringing.)
I'm linking up with there great blogs: House of Hepworths, The Shabby Creek Cottage,
Saturday, June 15, 2013
Getting Ready to Move

Well, the reason I have been so busy lately and not getting many projects done is that we are moving. We are now less than 2 weeks from closing, so it is basically official. This was our first home we bought, and the first we have sold. Unfortunately this has been one of the worst experiences of my life. My husband being acutely sick and in the ICU, and my 3 year old choking (requiring me to perform the Heimlich Maneuver on him) were worse. That's not saying much, is it?....... I really can't go into detail about it now because it will make me physically ill. Lets just say I have to make peace and move on. Easier said than done..... But I am working on it.
So our dilemma is that we are building a house in a planned community and it will not be done for at least 4 months. Our house sold very quickly, which is good - and bad - as we are now homeless..... Thankfully, I have a wonderful mother in law who we will be living with until our house is ready. Many may not see this as ideal, but I do. I get along really well with my MIL and am blessed to have her in my life. I can see that I will easily get spoiled living with her. Mr. Thrifty (my hubby - who is anything but thrifty) works weekends. My MIL does not. This means I can go for a run or workout on a weekend BY MYSELF, or go get my haircut BY MYSELF! This has me sooo excited. My single non-mom self would think this is totally lame - but it is so exciting to me now!
So one chapter closes, and another opens. I will have so many new thrifty things to share in the new house. It will have to be thrifty because we tried to spend money where we felt it was necessary during the build process. For example enlarging the covered patio cost extra, but if we don't do it now, we won't do it later, or it will be costly. We beefed up the baseboard and door trim moulding and raised the ceiling height in the upstairs as well. I may do a post on all the options and what to choose now and why. It can all be so overwhelming.....Many things we saved for me to add our touch to our home and personalize it the way we like!
Now if I can only get through packing and moving I will be golden. It may be quieter around here for a little bit, but if I don't do creative things I get cranky, so I will have a project - or two - to share!
Monday, June 10, 2013
Painted Rustic Wooden Flag

July 4th is my most favorite holiday of the year. It is a non-gift giving day where we celebrate our great nation and it's Independence and get together with family and friends. In my very tiny humble opinion, there is no place like New England for July 4th Celebrations. Nothing fancy or elaborate but everyone has a BBQ or party to throw or attend, and the night always ends with fireworks by the water. The day usually involves games, the beach, water sports, sitting around and talking, sparklers, food, badminton, bocce ball, horse shoes and of course some beverages! Ever since moving away I try to make it home for this holiday but it does not always happen. I try to make the best of it where ever I am, but the vibe and the feeling from the entire community and town is just not the same as it is in my home town.
Now, I am sure there are other parts of the country that have their own traditions and have awesome celebrations too. This is just my observations based on 2 locations only!
I have been wanting to make another sign lately and July 4th has been on my mind. When I don't make things for a while I get cranky and irritable..... So today, the boys were watching a movie because they had been playing outside and it is way to hot out for all day play. I decided not to watch Despicable Me and I went into the garage and found a scrap piece of cedar from an old fence we removed. I had to use that size because my garage is a complete mess and I was not about to get a saw set up.
This is my ugly board, complete with dirt and grass stuck to it... It has a total transformation in about 30 minutes.

So, I sanded my board and then brushed it off. I measured it and it was just over 5" wide. Perfect, 5 stripes just over 1" with red, white, red, white and red. I marked it off with painters tape and got out an old can of red milk paint that was from my kitchen island project. I used a foam brush because that is what was handy, and dry brushed it on.
This shows a few steps.


Here are all 3 stripes in red. I left a spot for the blue area just based on how I thought it would look. Not really measuring, just eyeballing it.
By the last picture above, you see where I am going with this? Right?
After letting the red dry slightly I did the same for the white stripes, using a small sample can of BM paint in Snowfall White. I used that on my kitchen cabinets too.

The blue area I dry brushed in the only dark blue I had, leftover from the boys headboard project.

The stars I did by hand, just placing them where I thought they would look good and using a small craft brush. They are not technical stars - more like starfish - but they were fast and easy to do!


I like it leaning on the wall and may just leave it there. I had origianlly planned to put eye hooks in the top and hang it somewhere. Maybe I'll make another sign for that!
Thank you for visiting today! Come back again!
I am linking up with some fabulous blogs: Between Naps on the Porch, Love 2 Upcycle, Creative Cain Cabin, Rain on a Tin Roof, Alderberry Hill, Making the World Cuter, Green Willow Pond, The Shabby Creek Cottage,
Thursday, June 6, 2013
ReStore Nightstand/Mini Dresser
I am so glad that we have a Habitat for Humanity ReStore in my city. It is such a great store and I find so many things there from cup pulls for 75 cents, to shutters for $3, to furniture. I found this little piece for $19.99. It has dovetail joints on drawers, was in great condition and had the neatest pulls. The hardware is a little more ornate than what I usually like, but they are so interesting that I decided to keep them......for now. I don't know what to really call this as is would be a perfect bedside table. I use it in our guest room/office for some drawer storage. This is how it looks now.

This is how it started life in my garage.....

Not bad. But I did not like the tone of the wood and it had a lot of dings and scratches in the finish. I also wanted to highlight the cool wood work around the corners and the top drawer. I decided to use paint and glaze to do that.
I painted it with Benjamin Moore (my favorite paint) in a Pearl finish. I LOVE this finish. It is hard and slightly shiny, almost enamel like. The color is Nantucket Breeze which is a soft green. I also used on my table base when I painted my oak dining table base. It has an off white look from afar, but it is the same color as this little dresser. You can just see the table base here.

Anyways.......I glazed over the paint after it had dried and rubbed the glaze into the crevices really good, then wiped most of the rest off. This finish is so nice that I did not have to use furniture wax on it. I just let it sit for several days - maybe more - to ensure that the paint was cured.


I just love this little piece and it gives me the perfect amount of hidden drawer storage.

Thank you so much for visiting me!!!!!!
Please visit Miss Mustard Seeds blog party, I'm linking up!
Subscribe to:
Comments (Atom)